Friday, January 13, 2012

Pretties

I can share this little find now...

Uploaded from the Photobucket iPhone App

I found these for my friend Holly (Hi, Holly) for her birthday. Her birthday is December 27th but I just got to celebrate with her this past week.

Now these have a story! It goes way back to January '11. We were planning my Sister's bridal shower. We were doing a very fancy tea party type setting and serving our guests on vintage snack sets...did I mention the guest list was over 100?? (thank you sister).

While I have around 30 place settings of my own and my Mom and sister have similar...I needed more. I was calling all my friends borrowing snack sets.

I called Holly. Here's how it went down:

Me: Hey, can I borrow your snack sets for Sarah's shower?
Holly: I don't have any snack sets.
Me: Really?
H: Yes. I don't know why.
Me: Me either. We need to fix that!

Enter Salvation Army while I was looking for white vases. Well, I happened across this pretty little snack set...all four were there, cups included, no chips!

Extra bonus: pinkish roses. Holly's fav. china print. SCORE!!!

Since Jj and I moved twice in the past year, I was in a bit of a panic. I was sure I knew right where they were...wrong. However, they have been properly located, packaged and gifted.

Happy Birthday Holly!

Have you harbored any great finds lately for the perfect gift for that special someone?

Wednesday, January 11, 2012

Faux Tin Kitchen Back Splash

At our old house, we Jj installed the most beautiful back splash! I still love it. And I swore that I was getting that same back splash in my next house.

Well, I still love the back splash so much I think I want to marry it but my new house begs for a different wall covering...that's for another day, another post.

Back to my old house. This is what the pieces look like up close:
Photobucket

We got ours at Home Depot (I {heart} Home Depot) but I can't seem to find the actual product on their website. However, I'm pretty sure I saw it the last time I was there. I noticed that Menards has the same stuff but slightly cheaper. At the time, our color was not carried by Menards.

Photobucket

We bought glue that goes into the caulk gun. You cut the sheets of back splash (I estimate them at being 18 inches X about 24 inches or so) with scissors. I recommend crazy sharp Fiskars or tin snips. Jj used tin snips.

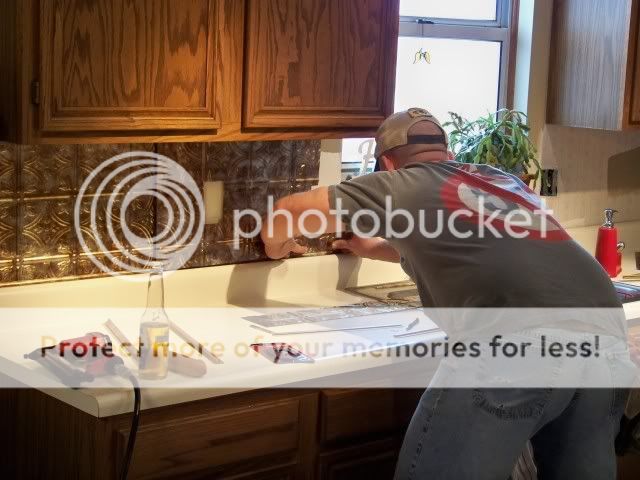
Then it's basically like putting sheets of scrapbook paper all over the walls. You cut out the outlets, around the windows, etc., to fit.

Photobucket

In the above picture, you can see the J-channel things that go between the back splash and the counter top. He used the air nailer to hold that channel piece onto the wall. Two pictures above, you see Jj fitting the sheet down into the quarter-round/J-channel piece.

Photobucket

Taking a break. :)

But see that piece lying over by the wall. That's the back splash cut to fit the window sil.

Photobucket

The thing that made this back splash take the longest was cutting around our wooden window sil. We elected to not try to take it off as we had a tough time with removing some of the trim in the basement and didn't want to mess up the wood.

Photobucket

Notice that beautiful outlet cover that matches the back splash perfect?? Yeah? Well, I MADE that. Yes, I did.

Let me show you how. And know that it took me almost as long to cover the outlets and switches as it did Jj to put up the back splash. However, I figured out a thing or two that I'm going to share with you so you are faster. :)

First, tools:
-Must have exacto knife!!
-New switch and outlet covers (they don't have to be new but they must be super clean for the adhesive. Covers are less than $1 so rather than scrubbing, I bought new.
-Cutting board

Photobucket

Cut the covering slightly larger than the outlet.

Photobucket

Notch out the corners all around. This is so when you wrap under the corners (next picture) you don't have a ton of bulky product.

Photobucket

Wrap all around.

Photobucket

Cut our the middle with slits going back so it will roll around the edge smoothly. Think about wrapping presents...it's a lot the same.

Press each tab really taught through the hole for the outlet. If there's too much bulk it will be difficult to get the cover back on the outlets. **Trust me**

Follow the same process for the light switches.

Now, I wish I had the back splash before pictures...it was TERRIBLE!!!!!!!!!!!!!!!!!
Let me just say that thou SHALL paint drywall prior to adhering ugly wall paper. Thou SHALT!

And another thing I loved about this kitchen:
Photobucket

The lighting!!!

It's oil rubbed bronze and simply beautiful! Jj and my Dad put up the track lighting. Apparently it was quite difficult and slightly ugly to make that pretty swirl I wanted.

**Love those guys for working so hard to make my mind's eye come to reality!**

If I may, I'd like to show you my favorite picture again:

Photobucket
Let me know, in the comments, if you have any questions!

**I received no compensation for this post. The opinions and instruction ideas are all mine.

What's your favorite thing about your kitchen?

I'd love to know as I'm gathering inspiration for my current kitchen.

*Edit*
I liked up to Show us your Kitchens at Thrifty Decor Chick.

Tuesday, January 10, 2012

SunRise!

I want you to see what I saw yesterday morning...beautiful!!!

Uploaded from the Photobucket iPhone App

That's the moon. As I was grumbling to myself about being out and about before the sun, I was reminded of the beauty of God's Earth.

Uploaded from the Photobucket iPhone App

As I drove a couple more miles (obviously in the opposite direction), the sun began to rise... B--E--A--U--T--I--F--U--L!

Uploaded from the Photobucket iPhone App

And I began to be thankful that I was awake and up and outside!

Uploaded from the Photobucket iPhone App

Uploaded from the Photobucket iPhone App

Yes, I took these with my cell phone, yes I was driving. No that probably wasn't safe but there are limited cars on the road and aren't you glad you didn't miss this??

Saturday, January 7, 2012

Let us E-A-T! (again)

I received a couple of comments on my first EAT post requesting more pictures to better see the context of our EAT sign.

Here we go!

This is looking from the doors to my sun porch. To the right, the door way is into the living room with our fireplace. The doorway on the left...if you look really close, you can see the edge of the staircase.
Uploaded from the Photobucket iPhone App

This one is from the kitchen side. I think I was standing between the sink and the cook top. Don't you love my pretty white appliances...NOT.
Uploaded from the Photobucket iPhone App

Here, I was standing by the dining room table. Looking into the kitchen area. To the right of the refrigerator, that hallway goes to our bedroom. There's a coat closet, half bath, laundry room and stairs that go down to our family room.
Uploaded from the Photobucket iPhone App

I also noticed that you see Janie's purple dog on the ledge...I took it away from her for ripping a hole in it. :) Also, that's a vintage toast rack up there holding our Christmas cards.

I have huge plans for this kitchen...I'll share them as they get closer to reality.

Time and Money...two things this kitchen is going to require. :)

What's your project for the new year?
And, what do you think of my EAT? Is Jonny right? Should they go? (Fingers crossed you are on my side.:) )